Spring Cloud入门之Eureka篇
前言
随着互联网的发展,系统的集成度越来越高,往往一个系统伴随着多个子模块,子系统,为了降低系统的耦合性,我们就需要将系统的各个模块之间解耦,将不同的功能做成一个个独立的模块,然后根据系统的需求来进行组装,这样对于系统功能的升级,变更等等都能够只操作对应的模块,从而减少系统的不可用时间。
由此,微服务这个概念就诞生了,现在的微服务架构国内常用的就是Dubbo和Spring Cloud,对于现在而言,几乎所有的java开发都是基于Spring生态来进行构建的,所以Spring Cloud这种架构就更加利于我们学习微服务这种架构模式。并且Spring的生态也更加完善。本系列就是记录一下学习Spring Cloud的一些知识点,以便于以后在工作中能够迅速查阅。现在就从Eureka注册中心开始学习。✊
简介
Spring Cloud 将 Eureka 与 Netflix 中的其他开源服务组件(例如 Ribbon、Feign等)一起整合进 Spring Cloud Netflix 模块中,整合后的组件全称为 Spring Cloud Netflix Eureka。
Eureka 是 Spring Cloud Netflix 模块的子模块,它是 Spring Cloud 对 Netflix Eureka 的二次封装,主要负责 Spring Cloud 的服务注册与发现功能。
服务注册和发现对于微服务架构而言,有了服务发现和注册,只需要使用服务的标识符就可以访问到服务,而不需要修改服务调用的配置文件。
实现原理
Eureka 采用 CS(Client/Server,客户端/服务器) 架构,它包括以下两大组件:
- Eureka Server:Eureka 服务注册中心,主要用于提供服务注册功能。当微服务启动时,会将自己的服务注册到 Eureka Server。Eureka Server 维护了一个可用服务列表,存储了所有注册到 Eureka Server 的可用服务的信息,这些可用服务可以在 Eureka Server 的管理界面中直观看到。
- Eureka Client:Eureka 客户端,通常指的是微服务系统中各个微服务,主要用于和 Eureka Server 进行交互。在微服务应用启动后,Eureka Client 会向 Eureka Server 发送心跳(默认周期为 30 秒)。若 Eureka Server 在多个心跳周期内没有接收到某个 Eureka Client 的心跳,Eureka Server 将它从可用服务列表中移除(默认 90 秒)。
运行原理如下图: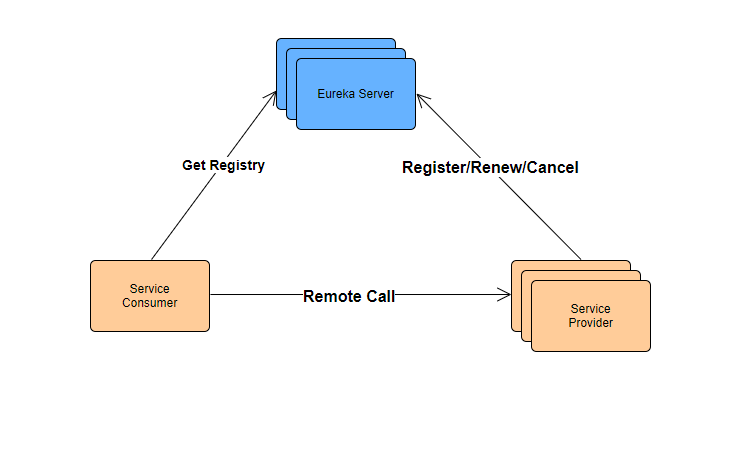
- 服务注册中心(Register Service):它是一个 Eureka Server,用于提供服务注册和发现功能。
- 服务提供者(Provider Service):它是一个 Eureka Client,用于提供服务。它将自己提供的服务注册到服务注册中心,以供服务消费者发现。
- 服务消费者(Consumer Service):它是一个 Eureka Client,用于消费服务。它可以从服务注册中心获取服务列表,调用所需的服务。
搭建注册中心
添加相关依赖
<properties>
        <java.version>1.8</java.version>
        <spring-cloud.version>Hoxton.SR12</spring-cloud.version>
    </properties>
    <dependencies>
        <dependency>
            <groupId>org.springframework.cloud</groupId>
            <artifactId>spring-cloud-starter-netflix-eureka-server</artifactId>
        </dependency>

        <dependency>
            <groupId>org.springframework.boot</groupId>
            <artifactId>spring-boot-starter-test</artifactId>
            <scope>test</scope>
        </dependency>
    </dependencies>

    <!-- 依赖管理 管理版本号以及子模块依赖 -->
    <dependencyManagement>
        <dependencies>
            <dependency>
                <groupId>org.springframework.cloud</groupId>
                <artifactId>spring-cloud-dependencies</artifactId>
                <version>${spring-cloud.version}</version>
                <type>pom</type>
                <scope>import</scope>
            </dependency>
        </dependencies>
    </dependencyManagement>
相关信息
这里需要注意Spring Boot和Spring Cloud的版本对应关系
application.yml
server:
  port: 8761 #服务端口号
spring:
  application:
    name: eureka-server #服务名
eureka:
  server:
    eviction-interval-timer-in-ms: 10000 #服务端间隔多少毫秒做定期删除的操作
    renewal-percent-threshold: 0.85 #续约百分比,超过85%的应用没有续约,那么euruka会保护拂去,不会剔除任何一个服务
  instance: #实例的配置
    instance-id: ${eureka.instance.hostname}:${spring.application.name}:${server.port}
    hostname: eurekaserver #主机名称 或者服务的ip
    prefer-ip-address: true #以ip的形式显示具体的服务信息
    lease-renewal-interval-in-seconds: 5 #服务实例的续约时间间隔
  client:
    service-url:
      defaultZone: http://eurekaserver:8761/eureka
    register-with-eureka: true #是否向注册中心注册自己
    fetch-registry: false #是否去检索服务
开启Eureka的注册中心功能
@SpringBootApplication
@EnableEurekaServer //开启euruka的注册中心功能
public class EurekaServerApplication {

    public static void main(String[] args) {
        SpringApplication.run(EurekaServerApplication.class, args);
    }
}
查看Eureka的服务监控界面: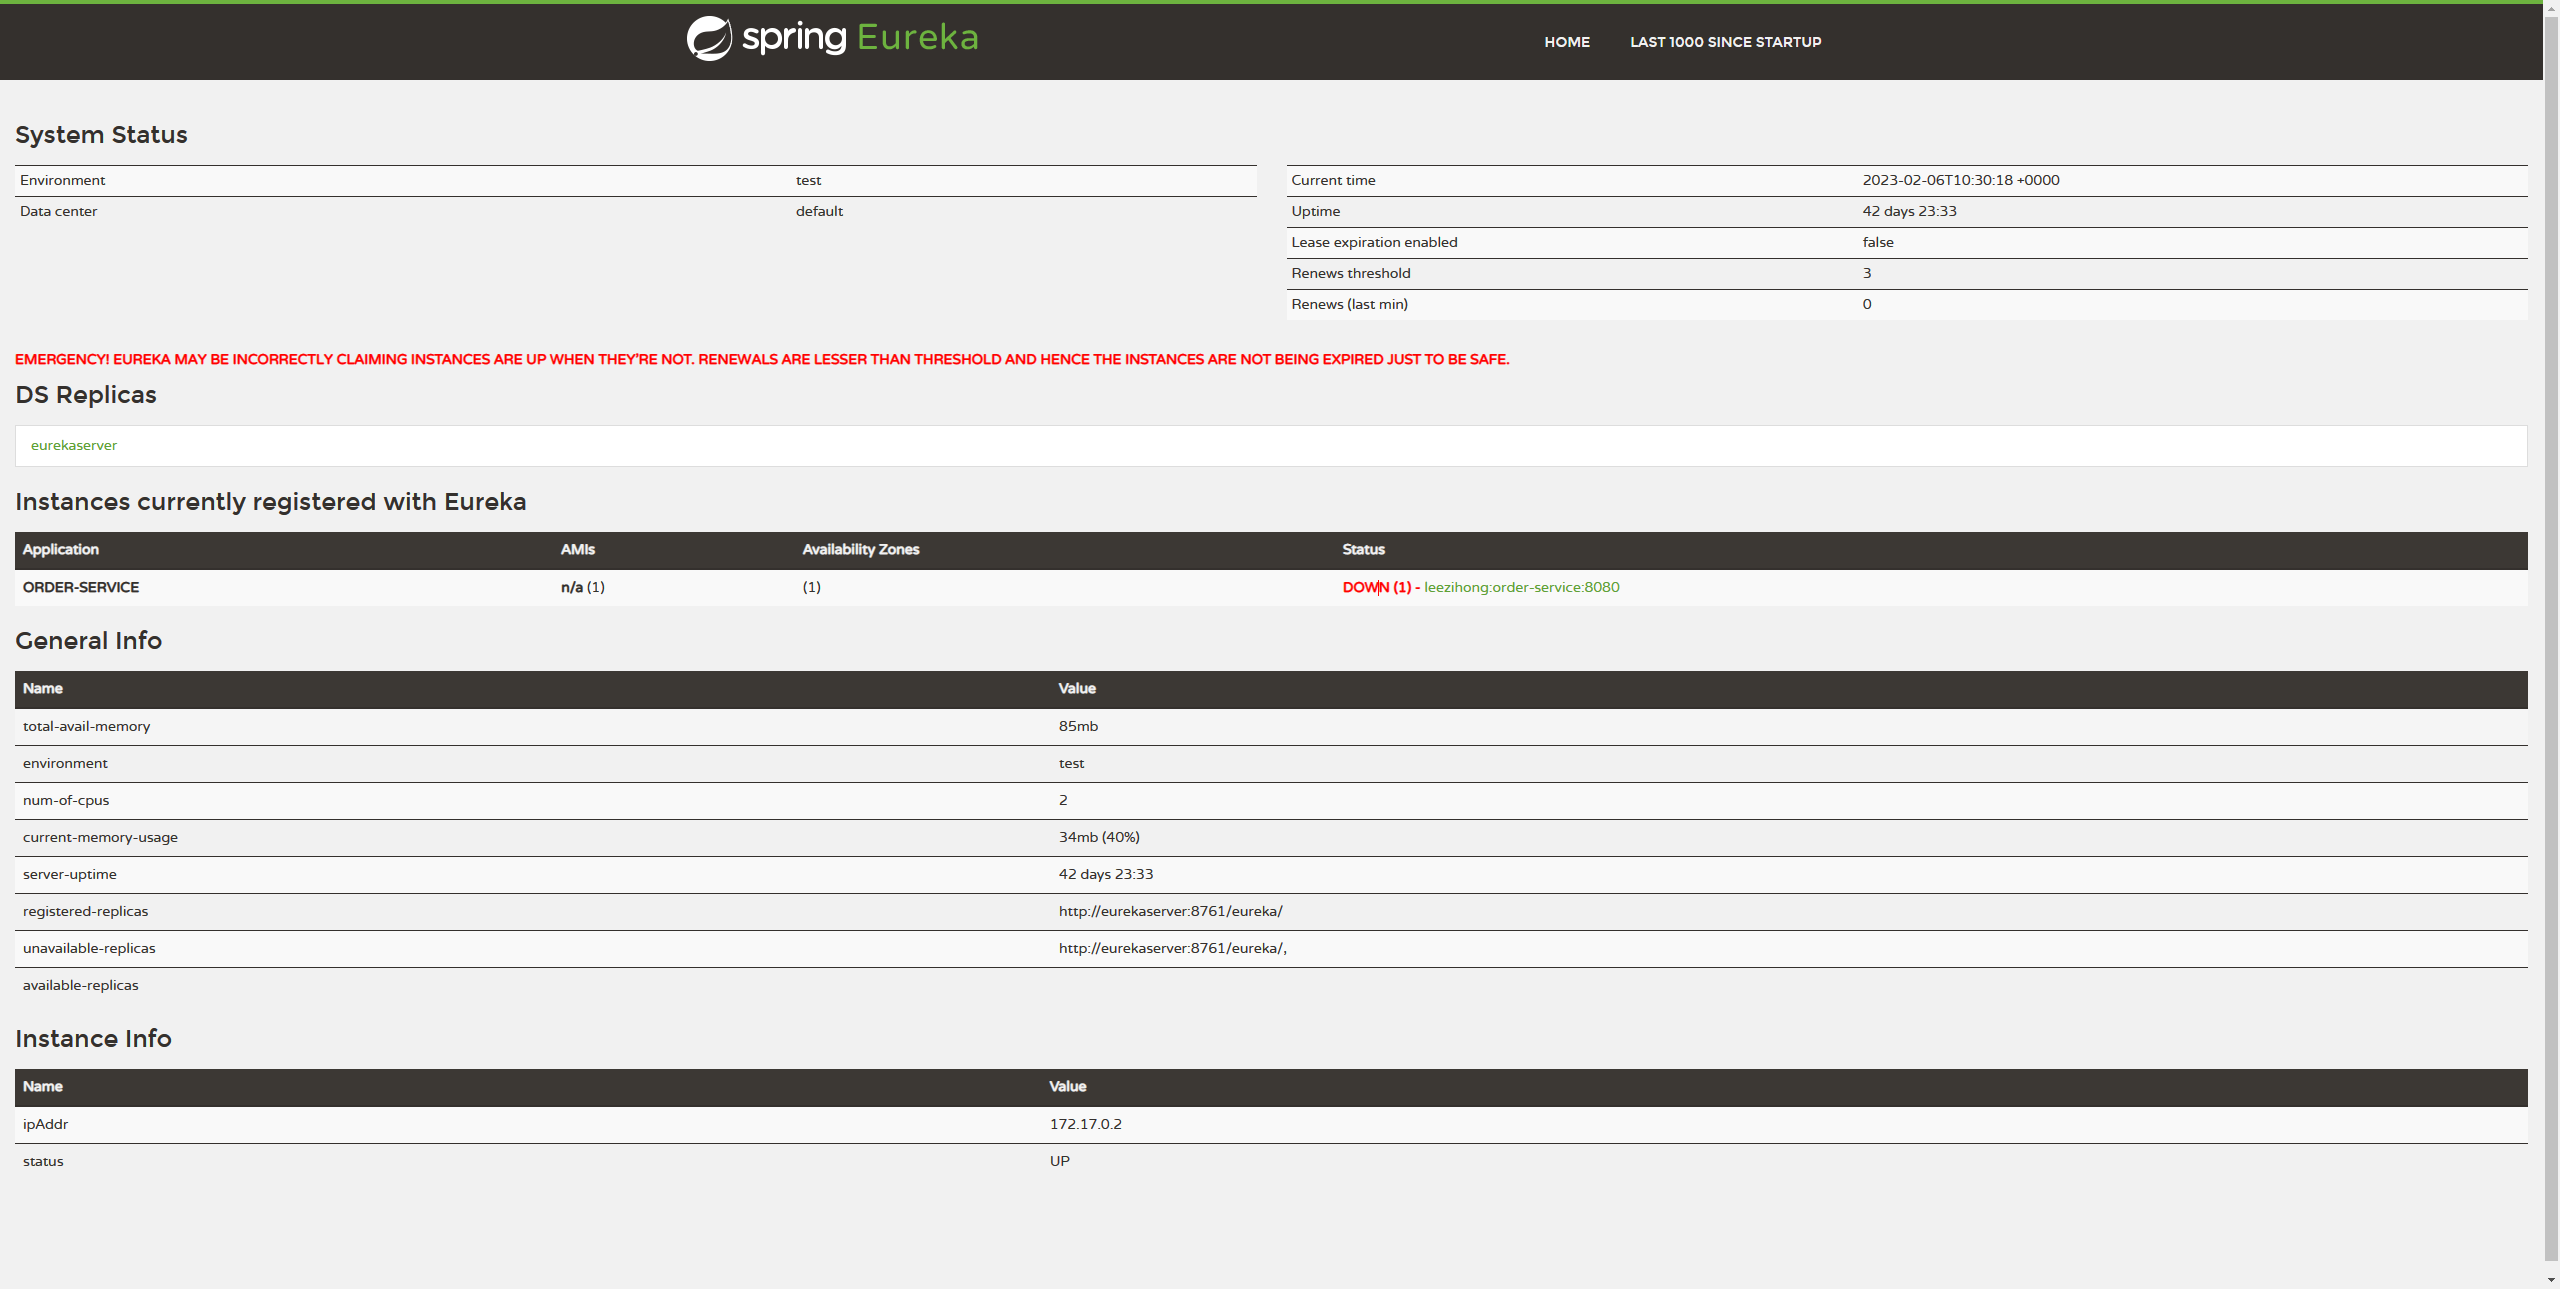
集群
Eureka作为服务的注册中心,如果Eureka挂掉了,那么整个系统就瘫痪了,所以为了保证注册中心这个核心组件能够实现高可用,那么就需要部署多个服务来组建成一个集群。
再新建两个同样的Module,因为我们是一台电脑模拟三台电脑,所以需要修改一下电脑的host文件,这个文件在C:\Windows\System32\drivers\etc下,如果文件不可修改,可以先复制出来,修改后覆盖原来的文件。
127.0.0.1  peer1
127.0.0.1  peer2
127.0.0.1  peer3
然后yml也需要修改
#peer1
server:
  port: 8761
spring:
  application:
    name: eureka-server
eureka:
  client:
    service-url: #默认往8761
      defaultZone: http://peer2:8762/eureka,http://peer3:8763/eureka
  instance: #实例的配置
    instance-id: ${eureka.instance.hostname}:${spring.application.name}:${server.port}
    hostname: peer1 #主机名称 或者服务的ip
    prefer-ip-address: true #以ip的形式显示具体的服务信息
    lease-renewal-interval-in-seconds: 5 #服务实例的续约时间间隔


#peer2
server:
  port: 8762
spring:
  application:
    name: eureka-server
eureka:
  client:
    service-url:
      defaultZone: http://peer1:8761/eureka,http://peer3:8763/eureka
  instance:
    instance-id: ${eureka.instance.hostname}:${spring.application.name}:${server.port}
    hostname: peer2
    prefer-ip-address: true
    lease-renewal-interval-in-seconds: 5


#peer3

server:
  port: 8763
spring:
  application:
    name: eureka-server
eureka:
  client:
    service-url:
      defaultZone: http://peer2:8762/eureka,http://peer1:8761/eureka
  instance:
    instance-id: ${eureka.instance.hostname}:${spring.application.name}:${server.port}
    hostname: peer3 #主机名称 或者服务的ip
    prefer-ip-address: true #以ip的形式显示具体的服务信息
    lease-renewal-interval-in-seconds: 5 #服务实例的续约时间间隔
然后启动,可以看到三台服务已经相互注册成功了 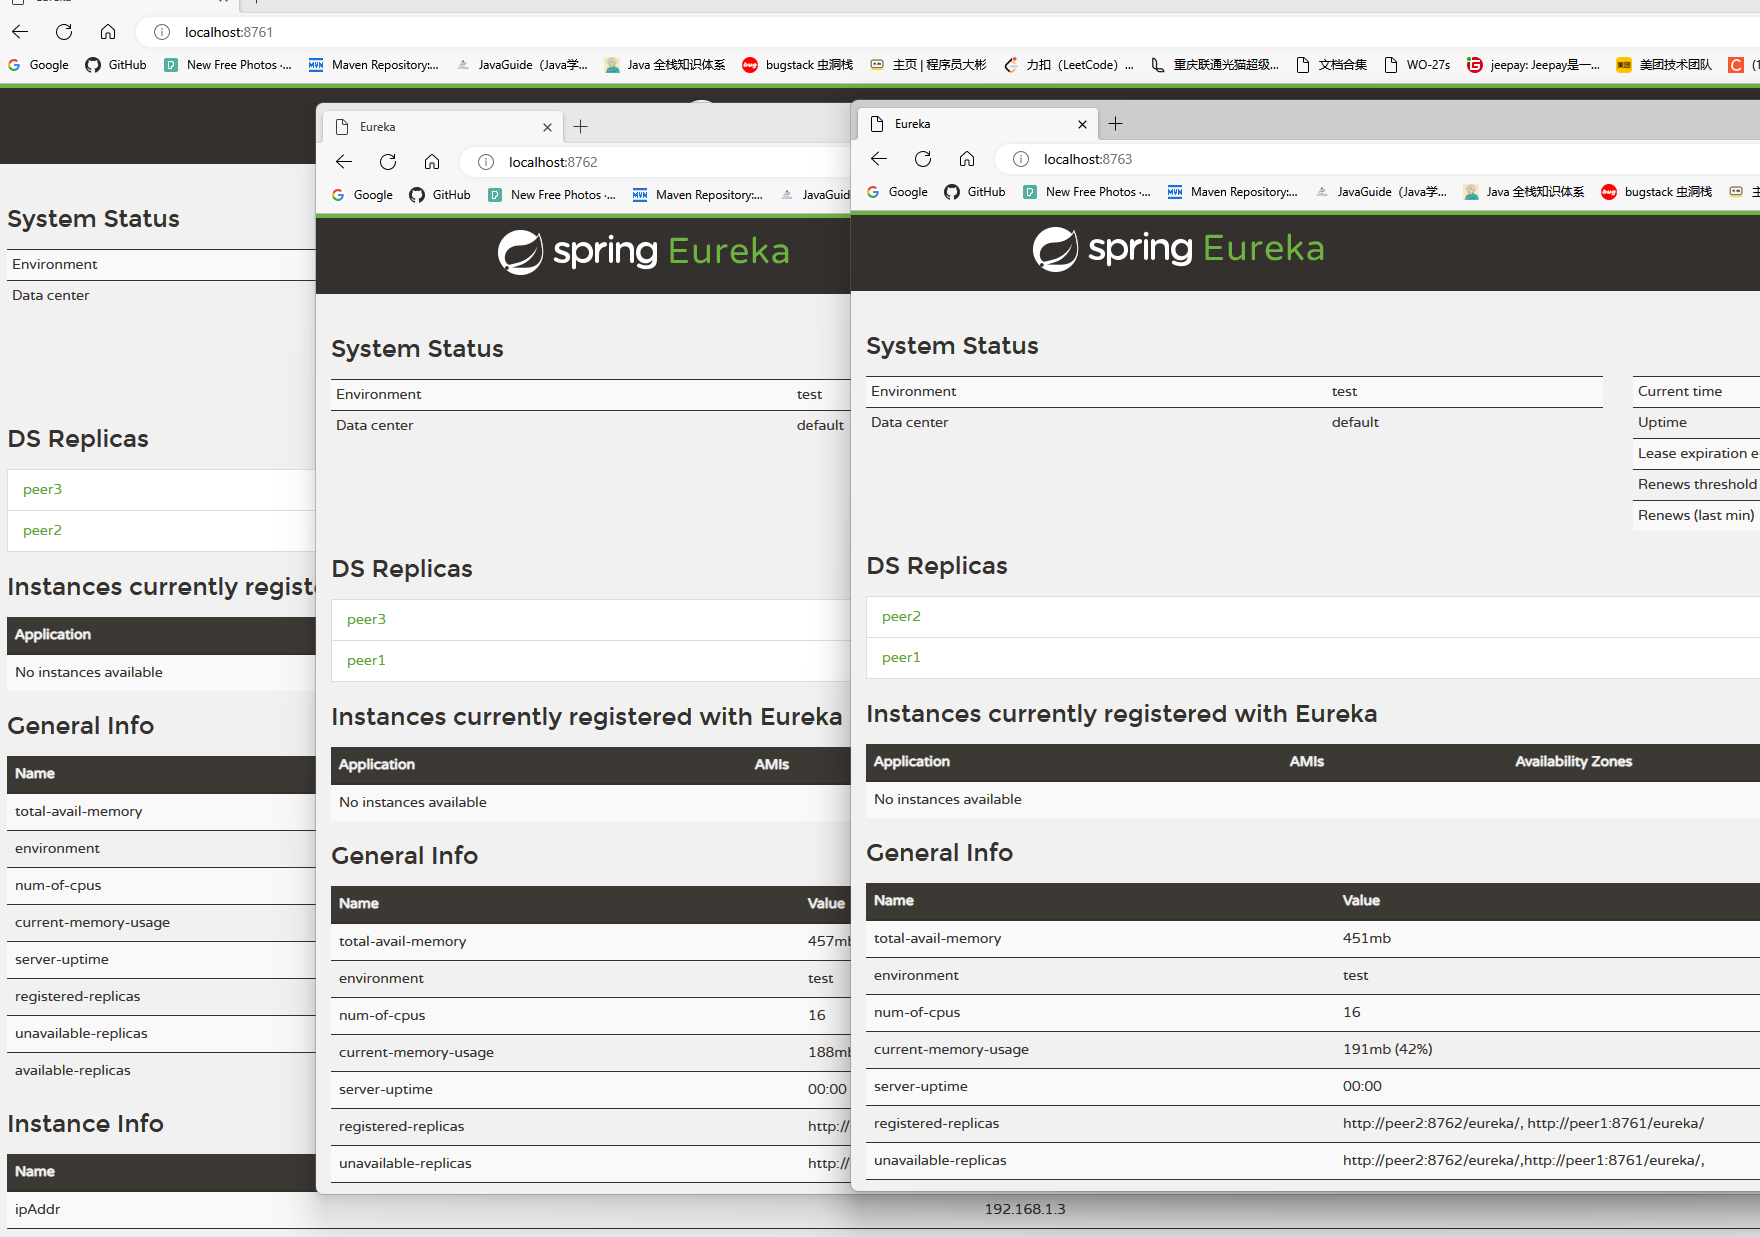
搭建一个客户端
添加相关依赖
<properties>
        <java.version>1.8</java.version>
        <spring-cloud.version>Hoxton.SR12</spring-cloud.version>
    </properties>
    <dependencies>
        <dependency>
            <groupId>org.springframework.boot</groupId>
            <artifactId>spring-boot-starter-web</artifactId>
        </dependency>
        <dependency>
            <groupId>org.springframework.cloud</groupId>
            <artifactId>spring-cloud-starter-netflix-eureka-client</artifactId>
        </dependency>

        <dependency>
            <groupId>org.springframework.boot</groupId>
            <artifactId>spring-boot-starter-test</artifactId>
            <scope>test</scope>
        </dependency>
    </dependencies>
application.yml
server:
  port: 8080
spring:
  application:
    name: eureka-client-a
eureka:
  client:
    server-url: #指定注册地址
      defaultZone: http://peer1:8761/eureka
    register-with-eureka: true #可以不往eureka-server注册
    fetch-registry: true #应用是否去拉去服务列表
    registry-fetch-interval-seconds: 10 #为了缓解服务列表的脏读问题,时间越短,脏读越少,但是性能越消耗大
  instance:
    instance-id: ${eureka.instance.hostname}:${spring.application.name}:${server.port}
    hostname: localhost #主机名称 或者服务的ip
    prefer-ip-address: true #以ip的形式显示具体的服务信息
    lease-renewal-interval-in-seconds: 10 #服务实例的续约时间间隔
开启客户端
@SpringBootApplication
@EnableEurekaClient
public class EurekaClientApplication {

    public static void main(String[] args) {
        SpringApplication.run(EurekaClientApplication.class, args);
    }

}
新建一个请求
我们每次请求这个接口,然后看打印出的信息来判断是连接的哪一台服务
@RestController
public class DiscoveryController {

    @Autowired
    //org.springframework.cloud.client.discovery.DiscoveryClient
    private DiscoveryClient discoveryClient;

    /**
     * 通过应用名称找到服务的ip和端口
     * @param serviceName
     * @return
     */
    @GetMapping("test")
    public String doDiscovery(String serviceName){
        //服务发现,通过服务名,获取服务集合
        List<ServiceInstance> instances = discoveryClient.getInstances(serviceName);

        instances.forEach(System.out::println);
        ServiceInstance serviceInstance = instances.get(0);
        String port = serviceInstance.getHost();
        System.out.printf("ip:"+port);

        return instances.get(0).toString();
    }
}


可以看待port是在变化的,因为我们是一台电脑模拟三台电脑,所以ip是固定的,可以根据端口来判断连接的是哪一个服务。这样一个简单的Eureka集群就搭建好了。